Quick Start
The Veva III comes ready to operate and includes:
- Four 13mAh Li-SOCl2 non-rechargeable batteries.
- Tools for battery replacement.
- An activated SIM card.
- A cellular antennae for communication and data transfer.
- Preconfiguration to user's Inzwa Cloud account.
No configuration should be necessary to operate the device.
Status Indicators
The Veva III indicates its status using the LEDs on the front of the device.

| State |  Power |  System Status |  Network |  Data Transfer |  M2M Command | Sensor |
|---|---|---|---|---|---|---|
| Power Up | Blue, then green when device powers up. | |||||
| System Boot | Twice each second | |||||
| Network Boot | Twice each second | Twice each second | ||||
| Network Registration | Twice each second | Every second | ||||
| System Up | Every four seconds | Every four seconds | Every five seconds | |||
| Event Dectected | Every four seconds | Every four seconds | Flash (Red) | |||
| Sending/Receiving Data | Every four seconds | Every four seconds | Flash (Green) | |||
| Sending M2M Command | Every four seconds | Every four seconds | Flash (Green) | |||
| Sensor Idled | Every four seconds | Every four seconds | Flash three times every three seconds | |||
| Power Down | Blue, then green unitl device powers down. | ) |

| State | Power | System Status | Network | FTP Activity | M2M Command | Sensor |
|---|---|---|---|---|---|---|
| Magnet Present | On (Red) | |||||
| System Boot | Twice each second | |||||
| Network Boot | Twice each second | Twice each second | ||||
| Network Registration | Twice each second | Every second | ||||
| System Up | Every four seconds | Every four seconds | Every five seconds | |||
| Event Dectected | Every four seconds | Every four seconds | Flash (Red) | |||
| Sending Data | Every four seconds | Every four seconds | Flash (Green) | |||
| Sending M2M Command | Every four seconds | Every four seconds | Flash (Green) | |||
| Sensor Idled | Every four seconds | Every four seconds | Flash three times every three seconds | |||
| Power Down Mode | Green until powered off (once magnet removed after 3 secs). |
Supplying Power to the Veva III
The Veva III can be powered using batteries or an external power source.
Battery Power
The latest models of the Veva III come with a rechargable battery pack that requires minimal disassembly to charge. Older models, however, must have their four 13Ah Li-SOCl2 batteries replaced once the have been depleted. If the Veva III does not power up using the instructions below, please follow these instructions to recharge, install, or change the batteries. Please click on the tab for the Veva III model you're using. The model number is shown on the back of the device.
- Remove the four exterior screws from the top of the device.
- Lift the device's top to reveal the battery retainer plate as shown below.

- Plug the provided power block into an outlet, then attach the provided USB-C cable from the power block to the USB-C port on the retainer plate to begin charging the device. Other external power sources may be used, though charging may be less optimal. The preferred charging method uses a USB PD type charging block and cable with at least three amps of supply power at 5 volts.

Swapping Bases
The device's top does not need to be attached to the base while charging. The top can be detached from the base from either end of the red ribbon cable and attached to a fully charged base to remain in operation.
- The LEDs on the side of the device and the retainer plate should start alternating between green and yellow, this indicates the device is charging.
- After 6 hours the LEDs on the device will shine solid green, this means the current charge cycle is complete. To start another charge cycle, simply unplug the USB-C cable from the device, then plug it back in. It takes approximately 3 cycles to fully charge the device.
- Follow the rechargable base LED guide to track the device's battery status.
- Once fully charged, place the device's top back on it's base.
- Install the four exterior screws.
- Plug the provided power block into an outlet, then attach a 6 pin USB cable from the power block to the external 6 pin USB port on the device to begin charging. Other power sources besides the block may be used, though charging may be less optimal.
D.C. Power
This method of charging the device through its external USB port does not work when using a D.C. power cable.

- The LED on the side of the device should start alternating between green and yellow, this indicates the device is charging.
- After 6 hours the LED on the device will shine solid green, this means the current charge cycle is complete. To start another charge cycle, simply unplug the USB-C cable from the device, then plug it back in. It takes approximately 3 cycles to fully charge the device.
- Follow the rechargable base LED guide to track the device's battery status.
| State | LED | |
|---|---|---|
| Not charging | Off |  |
| Charging | Alternating yellow/green |   |
| Charge cycle complete | Solid green | |
| Fully Charged | Solid yellow | |
Material Safety
- Li-Ion batteries are rechargeable and should handled and disposed according to the material safety information provided by the manufacturer.
- Li-Ion batteries have a Class 9 Hazmat shipping classification. Please follow the regulations when shipping batteries.
- The end user should not remove the Li-Ion batteries from the base. Doing so will void the warranty. Contact Inzwa for servicing of your rechargeable base.
- Remove the four exterior screws.
- Lift the device's top to reveal the battery retainer plate as shown below.

- Disconnet the battery power jumper(see below) from the battery retainer plate.

- Remove the six screws fastening the battery retainer plate to the bottom of the device.
- Remove the battery plate.
- Remove and replace the batteries with the postive end facing the reatiner plate.
- Place the retainer plate on the base being careful to match the two notches in the center of the retaining plate with its key.
Align the notches
Failure to align the notches in the retaining plate with its key on the battery compartment could lead to water ingress.
- Install the six screws fastening the battery retainer plate to the base of the device.
Check Battery Power
A button on the battery retainer plate can be pressed to check that all 4 batteries are supplying power. When the button is pressed, a red LED will illuminate for each of the batteries. If the LED doesn't illuminate, then check the battery's orientation and supply 3.6V by using a power meter.
- Reconnect the battery power jumper to the battery retainer plate.
- Place the top of the device back on it's base.
- Install the four exterior screws.
Ordering new batteries
Inzwa recommends replacing batteries before each project to insure the longest battery life while in the field. For a device with model number Veva III (see label on back), please contact Inzwa to purchase new batteries. For all other models of the Veva III, purchase Saft LSH20 or Fanso ER34615M from a vendor of your choice, or purchase Fanso ER34615M batteries directly from Inzwa. Please note that ER34615 or ER34615H batteries may not have enough drive current for the cellular modem.
Knock-off Saft LSH20 batteries are available on major online retailer websites. These batteries may not perform as well as genuine Saft batteries. Please contact Inzwa for a distributor of genuine Saft batteries.

Material Safety
- Li-SOCl2 batteries are non-rechargeable and should handled and disposed according to the material safety information provided by the manufacturer.
- Li-SOCl2 batteries have a Class 9 Hazmat shipping classification. Please follow the regulations when shipping batteries.
- Remove the four exterior screws.
- Lift the device's top to reveal the battery retainer plate as shown below.

- Disconnet the battery power jumper(see below) from the battery retainer plate.

- Remove the six screws fastening the battery retainer plate to the bottomm of the device.
- Remove the battery plate.
- Remove and replace the batteries with the postive end facing the reatiner plate.
- Place the retainer plate on the base being careful to match the two notches in the center of the retaining plate with its key.
Align the notches
Failure to align the notches in the retaining plate with its key on the battery compartment could lead to water ingress.
- Install the six screws fastening the battery retainer plate to the base of the device.
Check Battery Power
A button on the battery retainer plate can be pressed to check that all 4 batteries are supplying power. When the button is pressed, a red LED will illuminate for each of the batteries. If the LED doesn't illuminate, then check the battery's orientation and supply 3.6V by using a power meter.
- Reconnect the battery power jumper to the battery retainer plate.
- Place the top of the device on it's base.
- Install the four exterior screws.
Ordering new batteries
Inzwa recommends replacing batteries before each project to insure the longest battery life while in the field. For a device with model number Veva III (see label on back), please contact Inzwa to purchase new batteries. For all other models of the Veva III, purchase Saft LSH20 or Fanso ER34615M from a vendor of your choice, or purchase Fanso ER34615M batteries directly from Inzwa. Please note that ER34615 or ER34615H batteries may not have enough drive current for the cellular modem.
Knock-off Saft LSH20 batteries are available on major online retailer websites. These batteries may not perform as well as genuine Saft batteries. Please contact Inzwa for a distributor of genuine Saft batteries.
Material Safety
- Li-SOCl2 batteries are non-rechargeable and should handled and disposed according to the material safety information provided by the manufacturer.
- Li-SOCl2 batteries have a Class 9 Hazmat shipping classification. Please follow the regulations when shipping batteries.
- Remove the four exterior screws.
- Lift the device's top to reveal the battery retainer plate as shown below.
- Disconnet the blue battery power jumper(see below) from the battery retainer plate.
- Remove the six screws fastening the battery retainer plate to the bottomm of the device.
- Remove the battery plate.
- Remove and replace the batteries with the postive end facing the reatiner plate.
- Place the retainer plate on the base being careful to match the two notches in the center of the retaining plate with its key.
Align the notches
Failure to align the notches in the retaining plate with its key on the battery compartment could lead to water ingress.
- Install the six screws fastening the battery retainer plate to the base of the device. For Veva III models that have a springs inside the battery chambers, place an even force on the retiner plate with your fingers to thread the screws. Tighten the screws evenly to keep from bending the retainer plate as much as possible.
- Reconnect the battery power jumper to the battery retainer plate.
- Place the top of the device on it's base.
- Install the four exterior screws.
Ordering new batteries
Inzwa recommends replacing batteries before each project to insure the longest battery life while in the field. For a device with model number Veva III (see label on back), please contact Inzwa to purchase new batteries. For all other models of the Veva III, purchase Saft LSH20 or Fanso ER34615M from a vendor of your choice, or purchase Fanso ER34615M batteries directly from Inzwa. Please note that ER34615 or ER34615H batteries may not have enough drive current for the cellular modem.
Knock-off Saft LSH20 batteries are available on major online retailer websites. These batteries may not perform as well as genuine Saft batteries. Please contact Inzwa for a distributor of genuine Saft batteries.
Material Safety
- Li-SOCl2 batteries are non-rechargeable and should handled and disposed according to the material safety information provided by the manufacturer.
- Li-SOCl2 batteries have a Class 9 Hazmat shipping classification. Please follow the regulations when shipping batteries.
- Remove the four exterior screws.
- Lift the device's top to reveal the battery retainer plate as shown below.

- Disconnet the blue battery power jumper(see below) from the battery retainer plate.

- Disconnect four connectors (red and black wires) from the battery plate by gently pulling on the connector. Avoid pulling the wire leads.
- Remove the two screws fastening the battery retainer plate to the base of the device. Remove the battery plate while removing the batteries from the holes in the retainer plate.
- Remove and replace the batteries with the postive end facing the reatiner plate.
- Thread the wire leads through the holes in the retainer plate and place the retainer plate on the base.
- Install the two screws fastening the battery retainer plate to the base of the device.
- Reconnect the battery power jumper to the battery retainer plate.
- Place the top of the device on it's base.
- Install the four exterior screws.
Ordering new batteries
Inzwa recommends replacing batteries before each project to insure the longest battery life while in the field. For a device with model number Veva III (see label on back), please contact Inzwa to purchase new batteries. For all other models of the Veva III, purchase Saft LSH20 or Fanso ER34615M from a vendor of your choice, or purchase Fanso ER34615M batteries directly from Inzwa. Please note that ER34615 or ER34615H batteries may not have enough drive current for the cellular modem.
Knock-off Saft LSH20 batteries are available on major online retailer websites. These batteries may not perform as well as genuine Saft batteries. Please contact Inzwa for a distributor of genuine Saft batteries.
Material Safety
- Li-SOCl2 batteries are non-rechargeable and should handled and disposed according to the material safety information provided by the manufacturer.
- Li-SOCl2 batteries have a Class 9 Hazmat shipping classification. Please follow the regulations when shipping batteries.
External Power
All Veva III models can be externally powered. Please click on the tab for the Veva III model you're using to learn more about connecting external power sources. Model number is shown on the back of the device.
- Locate the connector nearer to the USB symbol on the top label.
- Remove the connector cover by grabbing the textured ring on the cover with two fingers, then pulling away from the device to release the cover from the connector. Do not twist the connector.
- Connect the USB cable to the Veva III by aligning the small red dots on the connectors, then push firmly until the connector snaps in place. Contact Inzwa if you need a cable.
- Connect the device to a USB compatible power supply (minimum 2 amps).
- Once connected to an external power source, use a magnet to turn the device on, unless it's already operating using battery power.

Using USB Power Packs
-
USB power packs can be used to power the Veva III. Many USB power packs will stop supplying power to devices that draw low power. Please be certain to use power packs that are able to recharge low power devices like smart watches, earbuds or fitness trackers.
-
The Veva III E01/W01 processor operates at a faster clock rate when powered via the USB connection. As a result, the device will consume more power lowering the longevity of a power pack's single charge. We recommend using an external power solar cable when operating the Veva III E01/W01 on an external battery.
Rechargable Veva III Models
D.C. power cables and solar panels can be used to externally power rechargable Veva III devices, but they cannot be used to recharge their batteries via Method 2.
The Veva III E01/W01 has a 7 - 18 volt input available via the USB connector. To utilize this source, contact Inzwa for a D.C. power cable. This one meter cable has a standard 5mm barrel connector with a terminal block adapter and will allow solar panels or power supplies to be connected to the device (see image below).

Solar panels should be at least 5 Watts and produce between 7 - 18 volts. Internal batteries should be used with a solar panel for nighttime power or a solar panel with a built-in battery.
Be certain to apply the correct polarity to the D.C. power cable. When using the screw terminal adapter, be sure to follow the polarity symbols printed on the connector. The center pin is positive on the barrel connector.
The Veva III E01/W01 USB and external power cables attach to the USB connector on the device. Both connectors have a cover connected to a chain that's necessary for the device to maintain its IP67 capability when cables aren't connected.
Remove the cover by pulling on the textured ring (don't turn to unscrew). To attach the cover or a cable connector, align the red dots on the connectors and push to lock in place.


- Connect the device to a USB compatible power supply (minimum 1 amp) using the USB Type A to Micro B cable supplied with the device.
- Once connected to an external power source, use a magnet to turn the device on, unless it's already operating using battery power.
Using USB Power Packs
USB power packs can be used to power the Veva III. Many USB power packs will stop supplying power to devices that draw low power. Please be certain to use power packs that are able to recharge low power devices like smart watches, earbuds or fitness trackers.
- Contact Inzwa for information on compatible solar panels.
- Connect the device to a USB compatible power supply (minimum 1 amp) using the USB Type A to Micro B cable supplied with the device.
- Once connected to an external power source, the device will begin its startup process automatically, unless it's already operating using battery power.
Using USB Power Packs
USB power packs can be used to power the Veva III. Many USB power packs will stop supplying power to devices that draw low power. Please be certain to use power packs that are able to recharge low power devices like smart watches, earbuds or fitness trackers.
- Contact Inzwa for information on compatible solar panels.
Power Cycling the Veva III
Connect the Antenna
Before powering the Veva III, connect the antenna.
- Connect the supplied cellular antenna (E01 models) or WiFi antenna (W01 models) to the antenna connector closest to the symbol on the top label. The two other antenna connectors (GPS and Bluetoth) are for future use.
- Hold the included magnet within ½ inch of the magnet icon on the face of the Veva III. The power LED will illuminate red when the magnet is detected.
- To turn the Veva III on, hold the magnet to the magnet icon until the power LED turns green. Remove the magnet.
- To trigger the Veva III to shutdown, hold the magnet to the magnet icon. The power LED turns red. Remove the magnet when the power LED turns green, then wait about 10 seconds to make sure no LEDs continue to flash.
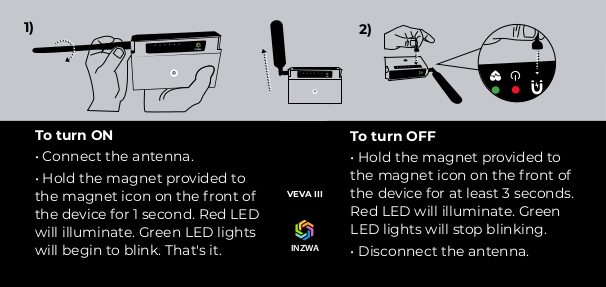
- Hold the included magnet within ½ inch of the magnet icon on the face of the Veva III. The power LED will illuminate red when the magnet is detected.
- To turn the Veva III on, hold the magnet to the magnet icon for 1 second. Within a few seconds green LEDs shou begin to flash on the device.
- To trigger the Veva III to shutdown, hold the magnet to the magnet icon for more than 3 seconds. ** Remove the magnet, then wait about 10 seconds to make sure no LEDs continue to flash.
About the magnet
Just about any magnet can be used to cycle the power on the Veva III. The device detects the north pole of the magnet.